

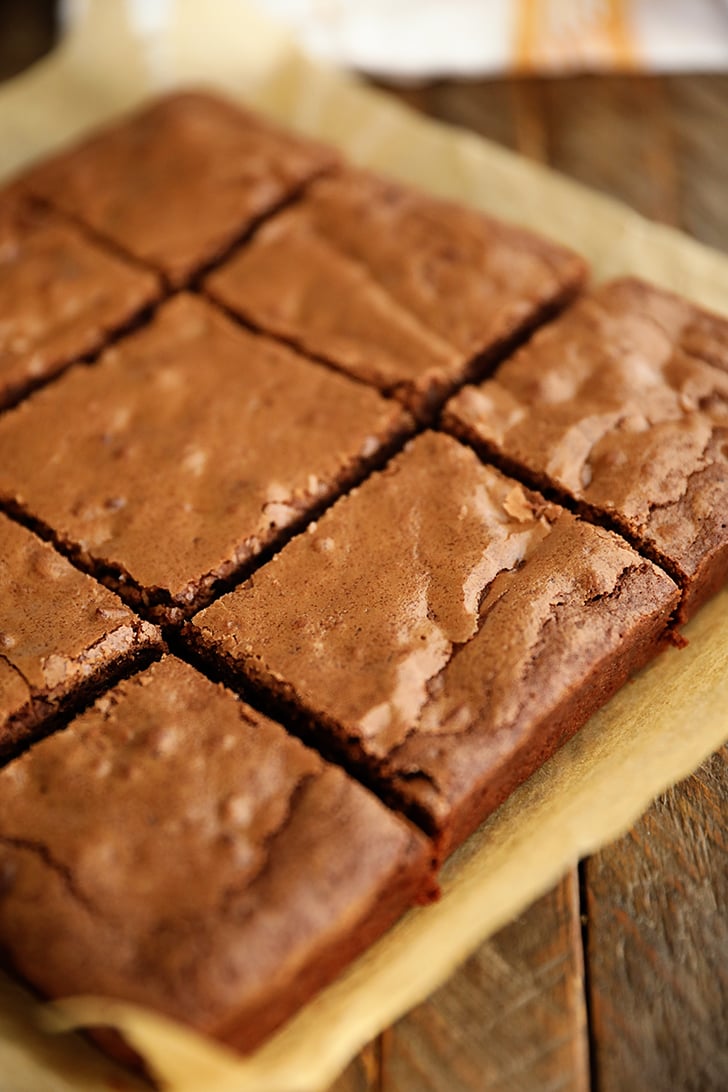
This easy, one-bowl recipe for my homemade brownies creates thick, chewy, fudgy brownies everyone will love! This is my favorite from-scratch easy brownie recipe!

Look. I’m no stranger to a boxed brownie mix. Growing up, I’m pretty sure that’s all I ever saw my mom make. And I’ll admit that I have at least two boxes of brownie mix in the pantry right now. (Ghirardelli is my favorite brand of boxed mix!)
But sometimes, you want to make something from scratch. Sometimes, you want a homemade brownie recipe. And when you want that, you want this recipe! Personally, I think this is the best brownie recipe… but that’s just me.
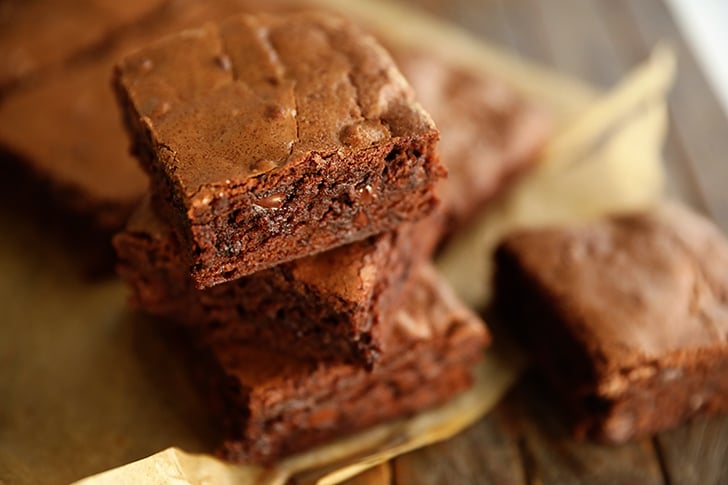
In general, folks fall into two categories when it comes to brownies: the fudgy category and the cake-y category.
I happen to think there’s only one kind. For me, the perfect brownie recipe has to yield brownies that are thick, chewy, fudgy, and super chocolatey. I included a scratch recipe in my cookbook, but over the last few years, I’ve tweaked the ingredients a bit and perfected the method to produce brownies that check all the boxes for me. And the best part is, they’re super easy – all made in one bowl!

4 Tips for Making Brownies with that Shiny, Crinkly top:
Getting that glossy, crackly top on your brownies is sort of the holy grail of brownie making. While I’ve never turned down a homemade brownie based on its matte finish, I do understand folks eat with their eyes first. And it doesn’t have to be super complicated. So here are a few tips to get that gourmet look every time…
- Use the Right Amount of Sugar: A good amount of sugar in your brownie batter helps create that shiny top. Typically, recipes with a higher sugar-to-flour ratio tend to produce a shinier surface.
- Melt the Butter: Melting the butter and incorporating it with the sugar very well is crucial. It helps create that fudgy texture and contributes to the shiny top.
- Whip Those Eggs: Whipping the eggs into the butter and sugar until they’re light can help to achieve that shiny, crinkly crust. It introduces a bit of air into the batter.
- Add Chocolate Chips: I’m not sure if it’s the additional fat or what, but I always have better luck getting that shiny top when I add chocolate chips to the batter. All that chocolate helps to keep them fudgy, too, so it’s a win-win.
How do I know when my brownies are done?
Knowing when your brownies are done can be a bit tricky, but fear not, I’m here to help you nail it…
- The Toothpick Test: Stick a toothpick or a wooden skewer into the center of your brownie batch. If it comes out with a few moist, fudgy crumbs clinging to it, your brownies are perfectly baked. If the toothpick is clean, they might be overdone.
- The Gentle Press: Gently press the center of the brownies with your finger. If it springs back and doesn’t leave a dent, they’re done. If your finger sinks into the brownie, it needs more time.
- The Visual Check: Take a peek at the edges. They should be set and slightly pulling away from the sides of the pan. The top should be firm but not overly dry or cracked.
- The Timer: Follow the recommended baking time in your brownie recipe as a general guideline. However, remember that ovens can vary, so keep an eye on them toward the end of the suggested time.
- Don’t Overdo It: It’s better to slightly underbake your brownies than to overbake them. Brownies will continue to cook a bit as they cool in the pan.
Remember, it’s all about personal preference. Some folks love their brownies gooey and fudgy, while others prefer them cakey. So, adapt your baking time to achieve the brownie bliss you desire.
Should I use a metal pan or glass baking dish?
The hard and fast of it is to use a metal baking pan, specifically a light-colored aluminum pan.
Yes, I know that the video shows me using a glass pan. This is a case of do as I say, not as I do. Will a glass pan work, of course it will. Does metal work better, yes. Yes, it does.
With that being said, I’ve been cooking for more than 30 years and have been working on Southern Bite for more than 15 of those. And though I feel pretty confident in my culinary capabilities, the idiosyncrasies of using a glass versus metal vessel for baking escaped me for most of my Southern Bite years.
Needing several batches of Pecan Chewies for an event several years ago, I baked one in a metal pan and another in a glass dish. What I noticed is that the chewies in the metal pan cooked more evenly to a beautiful golden brown and had nice clean, straight edges. The ones in the glass dish rolled over on themselves around the edges, resulting in less-than-attractive tops.
A quick Google search proved that the world knew this and just left me out. But when you think about it, it just makes sense…
Metal pans heat up and cool more quickly since metal is a good conductor of heat. This means more evenly baked goods.
Glass pans retain heat better, which makes them great for keeping things like casseroles warm after taking them out of the oven. This can result in overcooked baked goods, too, though as the retained heat can cause things to continue baking even after being taken out of the heat.
All of this to say, I now recommend the use of a light-colored aluminum pan. Dark-colored pans can cause the outside of baked goods to get too hot and too dark, like with this Strawberry Bread I showed y’all a few years back.
For things like casseroles, pasta bakes, etc, I recommend using glass baking dishes.
Just keep in mind that you don’t want to use acidic things in metal pans as the acid will react with the metal. Fruit cobblers, crumbles, and other acidic ingredients should always be baked in glass or ceramic.
IF YOU USE GLASS: Reduce the oven temp to 300°F and increase the cook time from anywhere to 5 to 15 minutes.

Recipe Card
Homemade Brownies
Ingredients
- 3/4 cup unsalted butter
- 1 1/2 cups granulated sugar
- 3 large eggs (room temperature)
- 1/2 teaspoon salt
- 1/2 cup unsweetened cocoa powder
- 1 cup all-purpose flour
- 1 cup semi-sweet chocolate chips
- 1 teaspoon vanilla extract or flavoring
Instructions
- Preheat the oven to 325°F and spray an 8×8-inch metal baking pan with nonstick cooking spray or line it with parchment paper. Set aside.
- Place the butter in a large bowl and cover the bowl with paper towels. Microwave until the butter is melted and very hot. (Butter has a tendency to splatter in the microwave as the water particles get super hot and explode, so keep it covered.)
- Add the sugar to the melted butter and whisk for about 2 minutes. Add the eggs and continue to whisk for another minute.
- Add the salt, cocoa powder, and flour to the mixture. Stir until just combined.
- Add the chocolate chips and vanilla and stir until just combined.
- Spread the batter into the prepared pan and bake on the center rack of the oven for 25 to 30 minutes or until the center of the brownies is just set.
- Cool before slicing and serving. Store leftovers at room temperature in an airtight container.
Notes
Nutrition
* If nutritional values are provided, they are an estimate and will vary depending on the brands used. The values do not include optional ingredients or when ingredients are added to taste. If calorie count and other nutritional values are important to you, I recommend grabbing your favorite brands and plugging those ingredients into an online nutritional calculator.


Maria Zoltowski
Mine were underbaked. Followed recipe. I think temp is too low. Had to add almost 8 mins to baking time. Will try again at 350.
My testing process includes multiple tests and varying brands of ovens, and I didn’t find that the oven temperature was too low. However, every oven is different, so I think increasing your oven next time should fix that issue for you. Enjoy!
Dianna
I absolutely love these brownies! Thank you for this recipe.
Thanks, Dianna! Glad to hear they turned out great for you!
Martha Pardo
I have been searching for a perfect brownie recipe for awhile now. This is the PERFECT ONE!! So chewy, chocolate and plain delicious.
Not at all gooey and oversweetened like the box mixes. Thank you Southernbite. You r now my forever “go to” brownie recipe.
So happy to hear that you found the one, Martha!
Lori DeAngelis
Another yummy recipe. Thank you so much, Stacy!!
You’re so welcome, Lori!
Denise
Ok here’s the verdict! Absolutely delicious lol. I only used 1/2 the flour cuz it was very thick already. Also only used 1 cup of sugar and half the chips plus I put vanilla chips in there as well. Absolutely delish!! Thank you
Glad to hear it turned out great for you!
Regina
Ooh, this one is really good! Brownies used to be my favorite treat, but now that I’m older, they’re a little too sweet for me. So, I simply reduced the sugar by a third cup and I used a mix of white and brown sugars just because I like brown. And I only added a half cup of chocolate chips. I baked them in my muffin tin because I like the crispy edges, and they make nice individual servings (read: I don’t mangle them up when cutting into squares). At 325 degrees, it took about 35 minutes. They’re a wonderful texture; not too dense, not too cakey. This one’s a keeper!
Thanks, Regina! So glad you were able to tweak this one to your preferences.
Ree Leeds
Great recipe. You are right about homemade is the best recipe for yummy brownies. Topped them with a bit of vanilla buttercream. Delivered 200 of them to a soup kitchen. Gave out lots of joy. Making them again in December. Thank you so very much.
Buttercream frosting on brownies is one of my favorite things! These look great, Ree! So glad you enjoyed them!
Pam
Best recipe turned out so good!!
Thanks, Pam!
Chris
I’ve been making Stacey’s from scratch brownies since I purchased his southern bite cookbook and my family absolutely loves them. I use a special brownie pan that has multiple corners so everyone can get a corner brownie. I would never use any of the box brownies and you won’t either after you try these just once.
That’s awesome! I love hearing that you’ve been baking those brownies for so long. That pan sounds perfect! Everybody loves a corner piece, but I’ll fight you for a middle one. 🙂 ! I’m so glad your family enjoys them as much as mine does.
nah
Oooh tacky to use chatgpt to reply to your commenters
Oooh, tacky to assume. I don’t use ChatGPT to reply to comments. If you’ve spent a few minutes reading my replies, you’d know they’re personal, specific, and usually full of typos.
But hey, if calling me out on something you guessed at brings you joy today, I hope it pairs nicely with supper.
Tam Reed
I made these delicious, chocolaty brownies today and served them after dinner this evening. They were a huge hit! Great recipe. Easy to follow.
So glad they were a hit, Tam!
K williams
I’m not a brownie fan, but these were fabulous! I will make again!
I’m so glad to hear you enjoyed them, even as a non-brownie fan! It’s always great to win over a skeptic.
A Grohoske
I only had a glass pan. I changed the temp to 300 and set the timer for 30 min. They were not cooked at all so I set the timer for 10 more minutes. I’m now at a total of 55 min and they are still raw in the middle.
Glass and metal bake remarkably differently, which is why I recommend metal for this recipe. I explain more about this here: https://southernbite.com/the-great-bake-off-glass-or-metal-pans-for-baking/
Matthew J Thibeault
Best brownies I’ve ever had. In-freakin-credible. I added pecans.
I’m so glad you loved the brownies, Matthew! Pecans are a great addition for that extra crunch.
Susan Thompson
First try at home made brownies. Had to cook over an hour at 325 in my gas oven. Checked temp with thermometer. Once out of the oven, the brownies are very chocolatey, too much for us. If I try again, will omit the semi sweet chocolate chips.
Too chocolatey?? Is that a thing?? lol
Michelle
Best and easiest brownie recipe EVER!! I have already made these at least 8 times in the past 3 months! Thank you for the recipe.
I’m so glad to hear you love the recipe, Michelle! Making them eight times in three months is impressive! Thanks for letting me know!
Kathleen
Perfection , I used ceramic dish. After 30 minutes I turned up to 350 for additional 15 minutes. Next time I will do 350 degrees for just 30 minutes. I don’t know why I don’t have metal baking pans. Delicious
So glad they turned out great for you, Kathleen!
Kate Roy
Stacey,
I Love, Love, Love all your recipes! Keep posting them!
I think I was a Southerner in my previous life!
Thanks, Kate! More deliciousness is on the way!
Carol Dziuba
What a lovely recipe. I made these this morning, and when I went to prepare the pan, I realized that my daughter had borrowed my square pan . So I ended up using a round cake pan and it was fine. The brownies are dense, chewy, rich, and rather easy to put together. I have this recipe attached to my refrigerator with a magnet, I don’t think you can make a better brownie.
I’m so glad to hear you enjoyed the brownies! It’s awesome that the recipe has made it to your fridge! Thanks, Carol!
Patricia
Absolutely the BEST brownies I have ever made and eaten! Honestly, I randomly picked this recipe out of many online because the ingredients sounded good and the writeup sounded just like what I was looking for (plus southerners are know for being great cooks so the title of the post caught my eye). My first batch I made came out so moist, delicious chocolatey flavor, perfect texture, easy to make. Everything I wanted in a mouth-watering brownie! I followed the recipe exactly except for two ingredients: I added about 3/4 Cup of chopped walnuts. Also, I didn’t have quite the 1-3/4 C unsalted butter so I used 1-1/4 unsalted butter and 1/2 C salted butter. I used a tiny bit less than the 1/2 teaspoon salt to compensate. While baking I tested with a toothpick regularly nearing the end of baking time to make sure that I didn’t over bake. It was so hard to wait until the pan cooled off. To be honest, it was difficult to stop eating, and I usually can have self control! Actually, right now I’m about to make another batch! I highly recommend!
Rebecca
I used a glass baking dish- all I had. I left it in for 45 minutes at 300 as recommended, and still got goo. I let it sit for about an hour and a half or two – and it was still goo. I put it back in the oven at 325 for 15 more minutes, and still goo. WHAT did I do wrong??? The flavor is good, but it’s goo – not brownies.
Hey there! Sounds like you had a bit of a struggle with the texture. Using a glass dish can sometimes change how heat is distributed, so that might be why it didn’t set up as expected. Also, keep an eye on the baking time—sometimes it takes a bit longer depending on the oven and the dish. Glad to hear the flavor was on point, though! Maybe try increasing the temperature next time. Hope that helps!
Belinda
Can I use salted butter? It’s all I have. What about the salt in dry mixture if I am able to use the salted. butter?
Absolutely, you can use salted butter! Just keep in mind that the amount of salt in the butter is usually pretty small, so it shouldn’t affect your final product too much. Since you can’t reduce the salt in the boxed mix, it should still turn out great. Happy baking!
Peggy
I followed the recipe to the letter and it turned our spectacular.
I did add chopped walnuts as this is my husband favorite brownie and I used
a metal cake pan because I only had a glass shaped brownie dish.
I’m so glad to hear that it turned out spectacular! Walnuts are a great addition—definitely a tasty choice.
Cindy Martin
Totally delicious! I replaced the vanilla with espresso powder to give them a decadent chocolate flavor, and it did not disappoint!! Best and easiest brownies ever!
Thanks for sharing that awesome twist, Cindy! Espresso powder is such a great idea for enhancing chocolate flavor. I’m so glad you enjoyed the brownies!
Jill
Only had a dark metal pan, so baked in that. Took about an hour and was quite crispy around the edges, but still absolutely yummy! Hubby loved it, thanks!
I’m so glad to hear that it turned out yummy, even with the dark metal pan! Crispy edges can be so delicious. Thanks for sharing your experience, and I’m thrilled your hubby enjoyed it too!
Mama Jane
Hey Stacey! Every recipe of yours that I’ve tried has just knocked it out of the park. before i try this amazing looking recipe- we have family members with textural issues. I’m afraid chocolate chips are something that may be unexpected, and possibly problematic for this loved one. Can we leave those out?
Hey there! I’m so glad to hear my recipes have been a hit with you! You can definitely leave out the chocolate chips if they’re a concern. The recipe should still turn out great without them. Let me know how it goes!
TH
Easy recipe. Delicious! I made the mistake of doubling the recipe to make a 13×9 pan. The brownies are so rich, an 8×8 pan is really enough.
Thanks so much for giving the recipe a try! You’re right—these brownies are super rich, so an 8×8 pan usually does the trick. But hey, doubling it just means you’ve got extra indulgence to go around, right? 😉 Glad you enjoyed them!
mary
I am going to make these today, can’t wait to taste them. What is the best way to freeze them? Thank you
When I freeze baked goods, I typically do both a layer of plastic wrap and foil and then pop them in a freezer bag.
Mae
Hi Stacey,
I was looking online for a new brownie recipe and I found yours, AND your website. I made the brownies for a housewarming party and they were a huge hit! Everyone commented on how moist and DELICIOUS they were! As a mother of 7 and grandmother of 18, I’ve been baking for a long time and these were the best brownies I’ve ever made. I’m looking forward to trying more of your delicious looking recipes. Thank you so much and wishing you all the best!
Thank you, Mae! This comment made my day!!
Allie
Oh..my..word!! These are absolutely delicious! Needed to double for LD picnic and baked in 9×13, baked per recipe in metal pan for time indicated and then increased to 350 for additional 12 mins to accommodate for height. After baking I realized I forgot nuts, husband’s request, so drizzled warm caramel on top and sprinkled with chopped pecans! Absolutely decadent! Thank you for my new favorite brownie recipe!!
They look absolutely perfect, Allie! Glad y’all enjoyed them!
Michelle
I’m having the same issue as others. Brownies are going on 40 minutes in a glass dish and still not set. I just upped the temp to 350…
Did that get it fixed for you?
Jennifer
delicious, but I only had a glass pan, and after 45 minutes at 325 degrees the middle was barely set. I am wondering if it would have baked and set better at 350 degrees given I used the glass pan?
Glad you enjoyed them, but sorry to hear the baking time seemed off for you. Scientifically speaking, glass actually bakes faster than metal, but what happens is the outside edges get cooked faster than the middle.
Sandra
Made this easy recipe, but I am not having the same experience as other people. The brownies came out dry and dense with an overpowering cocoa flavor. This type of brownie is better suited for an ice cream sandwich.
Are you sure you measured the cocoa power correctly, Sandra?
Sylvia
These are so good! The brownies came out super moist with the shiny top, and the only thing I did differently was to bake an additional five minutes (so, 35 minutes total), because they were definitely still wet inside prior to that point.
This recipe is a keeper, like everything else I’ve tried from your blog. Thanks, Stacey!
Thanks so much, Sylvia! They look perfect with that shiny top crust!
Doris
Good day Stacey:
I will attempt to make them again… I’ll let you know . Probably by the weekend. I do LOVE your recipes! Blessings.
Thanks so much, Doris! I appreciate you!
Doris
Ok… so I made these in my brand spaning new oven today… I have to say that the temperature is too low. After 47 minutes, the center was still wobbly. Recipe was followed exactly , metal pan etc. Do you have a gas stove and oven? Maybe that is the reason you stated 325 degrees. I have not bake a brownie recipe at this temp before , only 350 degrees. I had to up the temp last ten minutes until they were set. Hopefully , that did the trick. They are still too warm to cut into.
Hi Doris! As I mentioned before, I have virtually the same oven as you and have always made these at 325. Do you happen to have an oven thermometer that you could use to ensure that your new oven is heating to the proper temperature? Sometimes new ovens need to be calibrated.
Doris
Hi Stacey!
As much as I hate turning on my oven in this oppressive heat, I am making them today. I got me a new GE stove/convection/ air fryer and this will be my first baking project. I would like to sub a half cup of light brown sugar instead of all white sugar. How do you think that will work. Love your recipes! Happy Saturday!
Hi Doris! You can try that for sure. I’ve only tested it the way it’s written. We have a GE Monogram combo oven with the air fryer like yours and have been very happy with it.
Doris
I do have an oven thermometer and will check it. The brownies are very good but were still quite soft … maybe I will experiment with the ratio’s of butter and eggs Perhaps 10 tablespoons of butter . Did I read it wrong? I think two eggs would have been fine. I hope you don’t think I want to pick at you. I love brownies and hope you will take my thoughts in good faith. Blessings!
No, I don’t think that at all! But I sure appreciate you saying that. I just want to see if we can figure out what happened.
Jack
Amazing recipe! I’m a teenager and am getting into baking! After the 5 other recipes I’ve tried, this was the best and easiest!! Thank you so much
Awesome, Jack! Thanks for letting me know! Happy baking!
John D
Will these cook ok in a foil square pan? Will the bottom burn? If so maybe put an insulated cookie sheet under it?
Yep, that should work just fine.
Kirsten
I used this recipe to make tea infused brownies, the tea blend is called Velvet Bliss its a chocolate covered strawberry tea made by a locally owned tea company called Piper & Leaf, and they came out amazingly. I steeped the tea in the butter to get the flavor into the brownies. I made them for my staff and they loved them so much they have asked for me to make them again!
How fun! Thanks for sharing, Kirsten! Glad to hear everyone enjoyed them!
Liz
I made these brownies a couple of weeks ago and they were so delicious. I used a mixture of chocolate chips(white, dark, semi and milk) and added cinnamon. OH and my 6yo accidentally cracked an egg where most of it went outside of the container so I added another egg. I didn’t have an 8×8 square so I used a light colored round cake pan with parchment paper in it. Tomorrow we are making them again and plan to double the recipe. I have to send most of it away because I will eat too much.
Ha! Glad to hear y’all enjoyed then, Liz!
Michael Day
Perfect recipe,i only changed the pan type to
Cast Iron
Nothing cooks quite like cast iron!
Stacey
These are wonderful! I got so many compliments on them! Your recipes never fail.
Thank you so much! I’m so happy to hear that!
Beth
I have to confess — I haven’t gotten to taste these yet. However…. Everyone who has tried them has positively raved about them! Guess I have a way to use up all the cocoa powder I found in the pantry 😁 Another five-star recipe from Southern Bite — thank you, Stacey! ❤️
Thanks, Beth! I hope you’ll get a bite, too!
Charleen
Made these in glass pan, Took them to church dinner. They were warmly received. Fabulous ! I think they are better than the name brands of box mixes. 📦 wonderful,will be making them again. You have the best recipes.
Thanks, Charleen! So glad everyone enjoyed these!!
Charleen
Made these today to take to dinner at church. DELICIOUS, plam to make them again fir my grandson s wife. She doesn’t have an oven. Hands down glorious taste!!!!!
So glad they turned out great for you, Charleen!
Susan
These look scrumptious. I’ve never made brownies from scratch, time to start!
I have a question about cutting them, how did you get yours to cut so smoothly? Mine always look shaggy after slicing, your lines are so clean and pretty, any tricks you can share would be appreciated. Thanks!
I hope you’ll enjoy these, Susan! Cutting them has a lot to do with the texture of the brownies, but here are a few tips: Use a sharp non-serrated knife, rinse it with warm water between each cut, try to cut in one large downward motion rather than sawing along. Hope that helps!
Joanne Stewart
I love a good brownie and these sound (and look) divine. Can’t wait to try them out!
Thanks, Joanne! Hope you’ll enjoy!
Rob Anderson
Great post with all those good tips!
Thanks, Rob!
Debbi
This sounds like my kind of brownie.. but I have a question… I’ve always been told by my granny who every time you make anything its with love and from scratch!.. however she always made her brownies with 1 egg to keep them fudge and chewey… anymore eggs will make it cake like… was my granny wrong? P.s. been making brownies fron scratch since I was 12 years old… pushing 70 years young…
No, your granny wasn’t wrong. Eggs do make them more cakey. In this case, there are several other ingredients that help to keep them fudgy in spite of the extra eggs. That being said, you can reduce the eggs, if you wish.
Aileen
Stacey, I did not know that about the metal vs glass pan! No wonder my snickerdoodle bars didn’t bake well the last couple of times. I couldn’t figure out why. They did what you described, they kind of rolled in on themselves around the edges and sunk in the middle a bit.
Also, thank you for the tips on the best brownies! I will save this recipe. 🙂
Glad you found that helpful! Hope you’ll enjoy these!
Regina
So metal pans are better for brownies and cookies?
Yep!